
Microsoft Compatibility Telemetry is a Windows service that collects diagnostic and usage data from Windows devices. While it can help improve product quality, some users may experience high CPU usage or privacy concerns. With research and facts, this blog will provide solutions and best practices for managing Microsoft Compatibility Telemetry.
What is Microsoft Compatibility Telemetry?
If you’re experiencing slow computer performance, high CPU usage, or high disk usage in Task Manager, the Microsoft Compatibility Telemetry service may be the culprit. This service, also known as CompatTelRunner.exe, is a part of Windows 10 and collects program telemetry information to send to Microsoft periodically. To resolve issues related to Microsoft Compatibility Telemetry, you can stop or disable the service.
To stop Microsoft Compatibility Telemetry from running, we will explain how to disable it below. Disabling the service will prevent it from collecting technical data about your hardware and operating system. To turn off Microsoft Compatibility Telemetry, you can use the Microsoft Compatibility Telemetry disable option or stop the service altogether. By doing so, you can prevent high CPU usage caused by Microsoft Compatibility Telemetry and improve your computer’s performance.
Fix the Problem that Microsoft Compatibility Telemetry Consumes a Lot of CPU Resources
The Microsoft Compatibility Telemetry process monitors your system to ensure software and security updates work properly across devices. While this service generally runs unseen, several issues could cause it to consume excessively high CPU resources, impacting system performance. Potential causes include:
- Operating system errors or delays in updating: If your OS is outdated or having problems, the telemetry process may work harder to compensate, using more CPU. Updating your OS and software/security patches can help resolve this.
- Telemetry service errors: Problems with the telemetry process itself could increase CPU usage. Refreshing the service, running file scans, and adjusting the schedule may fix issues and reduce overhead.
- Corrupt system files: Damaged or corrupted files used by the telemetry process can trigger extra CPU usage. Replacing impacted files will normalize operations.
- Diagnostic and feedback settings: Tweaking options around how much data the telemetry process collects and sends can lower CPU impact. Reducing submissions may improve performance.
- And more.
As a last resort, you can temporarily disable the telemetry service if high CPU usage persists after trying other fixes. However, the service provides important system insights, so this should only be a stopgap solution.
Update Windows 11/10 to Solve the Microsoft Compatibility Telemetry Issue
If you are facing issues related to compatibility telemetry in your windows ten or 11, then you need to update your PC’s operating system.
This is a straightforward process that can be done by following these steps:
- To install the latest updates, open the Start menu and click on Settings > Update & Security > Windows Update.
- Click Check for updates and install all available updates from there.
- Once the update has been installed, restart your computer and check if it was successful. This will solve the issue of compatibility telemetry on your PC.
Resolving Telemetry Service Errors
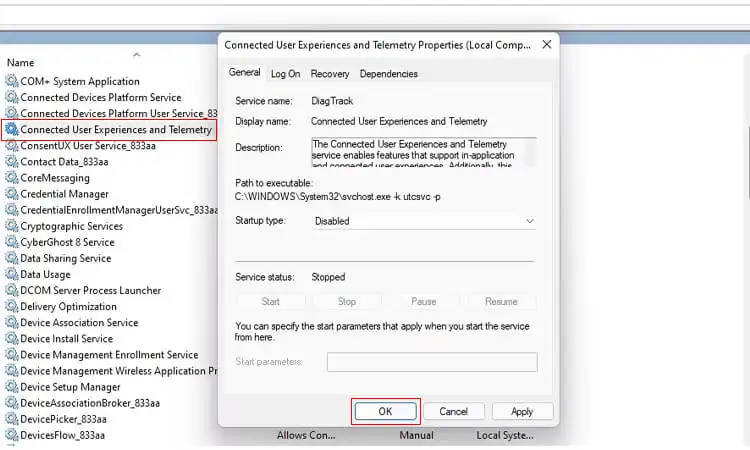
If you notice the Windows telemetry process consuming an excessive amount of system resources or causing performance issues, restarting the Connected User Experiences and Telemetry service is worth attempting. This service manages the telemetry process, so restarting it can help resolve any temporary problems that may have developed, reducing excess CPU usage, memory consumption, or other impacts.
To restart the Connected User Experiences and Telemetry service, follow these steps:
- Open the Services app by searching for “Services” in the Windows Search bar.
- In the list of services, locate “Connected User Experiences and Telemetry.”
- Right-click the service name and select “Restart” from the menu.
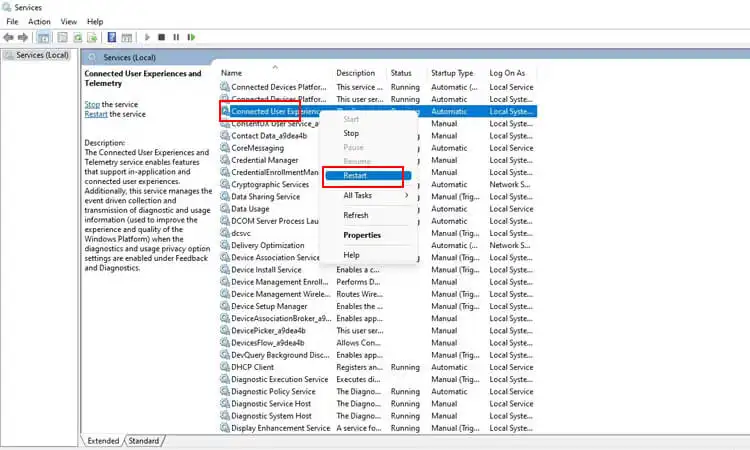
Restarting this service will refresh the management and monitoring of the Windows telemetry process, potentially fixing any issues that crept in and allowing it to operate again. This simple step can help improve system performance, responsiveness, and stability by optimizing a core Windows component.
Replace Or Delete CompatTelRunner.exe to Stop Telemetry From Using Your Disk Space
If you’re experiencing high disk usage and high CPU usage, there’s a chance that the culprit could be CompatTelRunner.exe. This File is a Windows Compatibility Telemetry process designed to monitor your system.
While running an SFC scan repair corrupted system files and fixes issues with CompatTelRunner.exe, manually replacing the file can help prevent persistent resource burden.
To replace CompatTelRunner.exe manually:
- Search for “Command Prompt” in the Start menu and right-click to run it as an administrator.
- In the Command Prompt app, enter:
takeown /f C:\Windows\System32\CompatTelRunner.exe - Press Enter. This will give you full control over the CompatTelRunner.exe file.
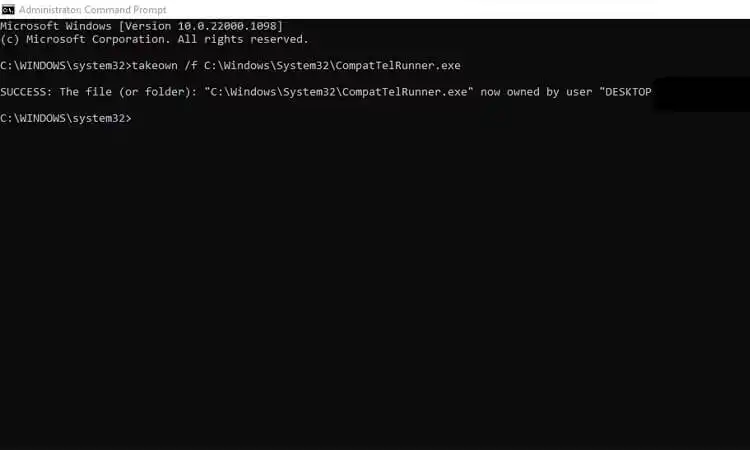
- Copy the CompatTelRunner.exe file from another Windows PC where telemetry is functioning properly.
- Paste the copied file over the corrupted CompatTelRunner.exe file in your system32 folder.
If replacing the file does not resolve high CPU usage from the telemetry process, disabling it is the next recommended step.
You can disable telemetry through:
• Services Console: Stop CompatTelRunner service
• Command Prompt: sc stop CompatTelRunner
• Registry Edits: Disable telemetry-related keys
Make sure to restart your PC after any changes to file copies, permissions, or service stop to ensure the telemetry process is no longer overloaded.
Here are the step-by-step guides to delete CompatTelRunner.exe:
- Step 1: Log into your computer using the administrator’s account with ownership. If you don’t know how to do that, just follow these simple steps:
- Go to Start > All Programs > Accessories > Run (or press Windows Key + R). Type “cmd” and hit Enter or click OK on the Command prompt window that pops up.
- You should see a black window with white text at this point. In order to switch from a standard user account (your current login) to an administrator account, type “net user administrator /active: yes” (without quotes) and press Enter or click OK on the Command prompt window again.
- That’s it—you’ve successfully switched from your standard user account to an administrator account! Now type “exit” in.
- Step 2: Find CompatTelRunner.exe and delete it by holding down Ctrl + Shift + Delete keys simultaneously on your keyboard (alternatively, you can also search for CompatTelRunner.exe in Windows Explorer).
- Step 3: Restart your computer to complete the process.
- Step 4: Check if Windows Compatibility Telemetry is still running in the Task Manager by opening it from the taskbar tray menu icon.
If not, then congratulations! You have successfully fixed Microsoft Compatibility Telemetry’s high disk usage or CPU issue without completely turning off Windows Compatibility Telemetry!
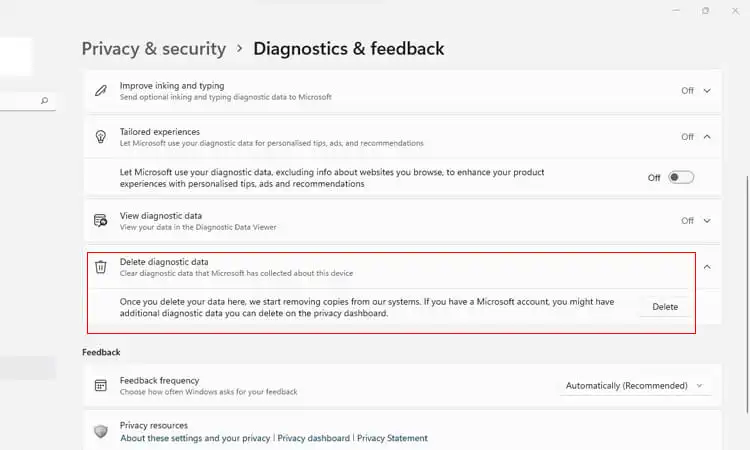
Control Windows Diagnostic and Feedback Settings
By adjusting Windows diagnostic and feedback preferences, you can limit how much optional data is sent to Microsoft. Reducing optional data collection helps minimize resource usage and ensures only necessary information is shared with Microsoft.
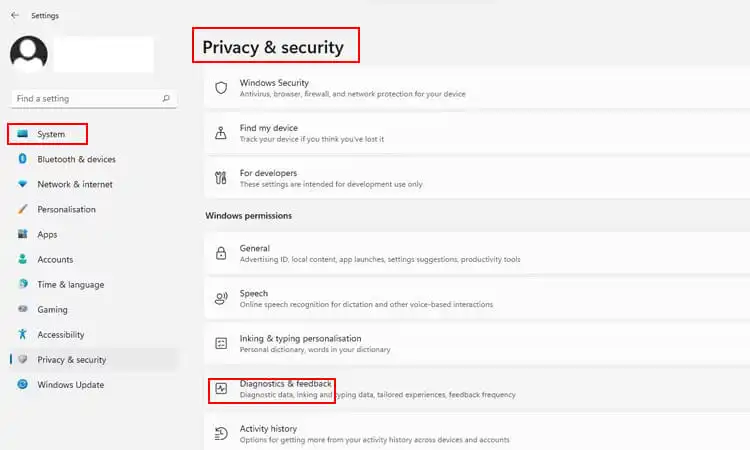
- To customize these settings, open the Start menu and select Settings.
- Go to Privacy & Security, then click Diagnostics & Feedback.
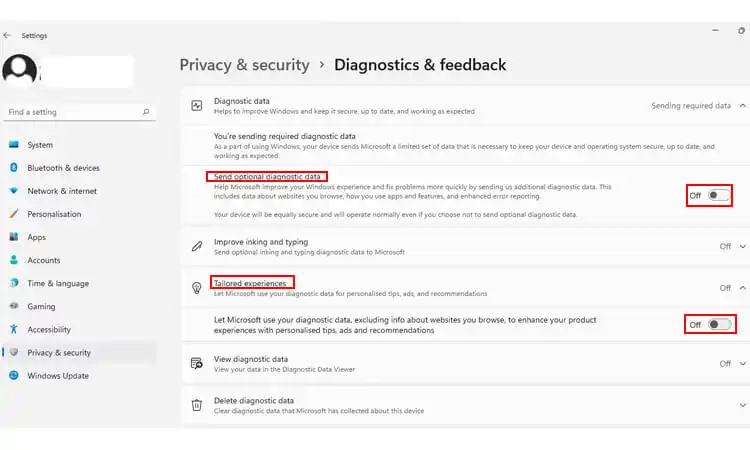
- To prevent Windows from sending optional diagnostic data to Microsoft, turn off the toggle next to “Send optional diagnostic data.” This will allow Windows only to collect required diagnostic information, conserving resources.
- You can also opt out of Microsoft’s tailored experiences recommendations by expanding “Tailored experiences” and turning off the toggle.
- For an additional level of control, delete any previous diagnostic data Microsoft has collected about your device usage and features. Expand “Delete diagnostic data” and select “Delete.” This will remove metadata about your devices, software, settings, files, and usage patterns to reduce Microsoft’s diagnostic footprint.
Control the Microsoft Compatibility Telemetry Process
By default, the Task Scheduler service automatically triggers the Microsoft Compatibility Telemetry process (ComparTelRunner.exe). You can adjust the timing and duration of this task to minimize resource usage during active hours.
- Open the Task Scheduler tool by searching for “Task Scheduler” in the Start menu.
- Navigate to Task Scheduler Library > Microsoft > Windows > Application Experience.
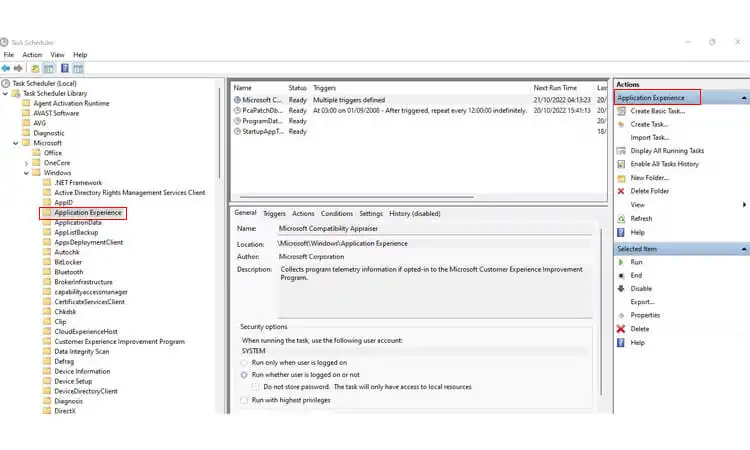
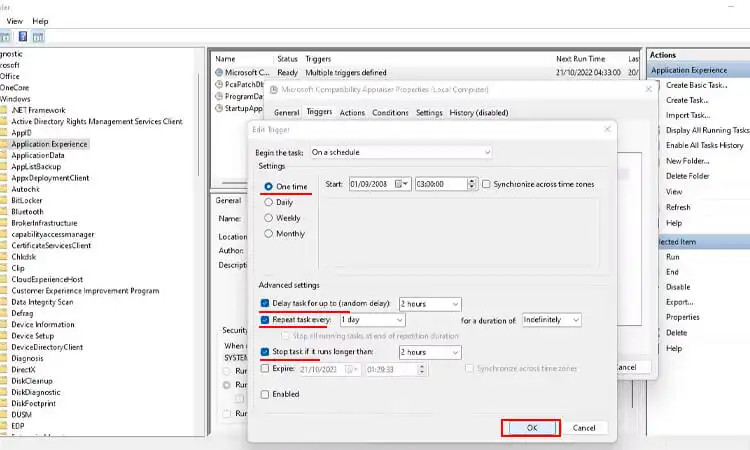
- Double-click “Microsoft Compatibility Appraiser” to edit the task.
- On the Triggers tab, click the enabled trigger twice and adjust the schedule only to allow the process to run when your device is idle.
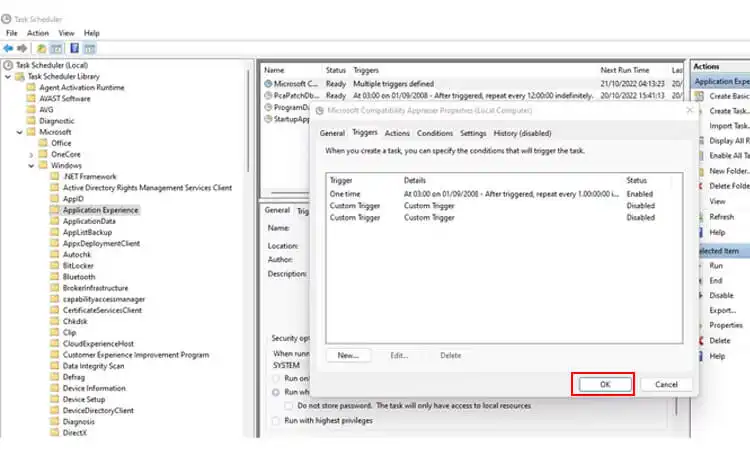
- Check “Stop task if it runs longer than” and select a duration that will not burden your system resources when you’re working. Click OK to save the change.
- Go to the Settings tab and uncheck “Run task as soon as possible after a scheduled start is missed.” This prevents the task from running if it misses the scheduled start time.
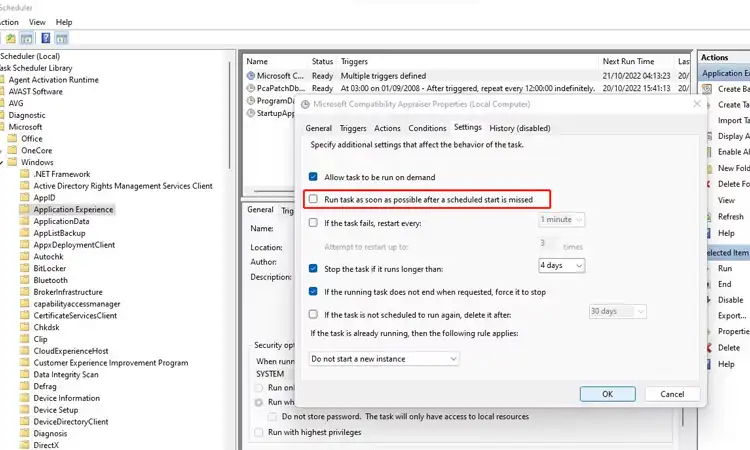
- Modifying the Compatibility Telemetry trigger and duration should limit when and how long the process runs, conserving system performance during your active users.
Fixing the Clean Up System to Solve Compatibility Telemetry High Disk Warning
Compatibility Telemetry High Disk is a problem that can be solved by cleaning up your system.
- Delete all unnecessary files and programs from your computer.
- Change your Windows Update settings to update manually instead of automatically to ensure compatibility with Microsoft Compatibility Telemetry High Disk problems.
- Update all drivers on your computer to the latest versions available, which will help prevent further Microsoft Compatibility Telemetry High Disk issues from occurring in the future.
- Run a full system scan using Malwarebytes Anti-Malware software to ensure there are no viruses or spyware installed on your computer that could be causing these issues with Microsoft Compatibility Telemetry High Disk occurring on your PC.
Reboot your computer once everything has been done above, so everything takes effect properly! This should resolve any issues you may have experienced with Microsoft Compatibility Telemetry High Disk occurring on your computer before now!
Disable Microsoft Compatibility Telemetry Windows 10 / Windows 11
Microsoft Compatibility Telemetry is a feature that collects information about the apps installed on your computer and sends it to Microsoft.
The data includes app settings, compatibility issues with other apps, usage patterns, and more. This helps Microsoft improve its own products and services.
This feature was first introduced with Windows 7 but was later removed from Windows 10 because of user complaints. The company added it back in Windows 10 in May 2018 with the April 2018 Update (version 1803).
The good news is that you can turn off this feature if you don’t want it to send data to Microsoft.
To limit Windows telemetry and data collection, you can adjust diagnostic settings to disable “optional data” sharing.
Press Win + I to open the Settings app and go to Privacy & Security> Diagnostics & Feedback.
Toggle the button beside “Send optional diagnostic data” off. This will prevent Microsoft from collecting data about the apps you use, websites accessed, system performance, and other details for troubleshooting purposes.
Then, Microsoft will only collect basic data regarding your hardware specifications, system configurations, and general functionality. This limited data helps ensure your system remains stable and operational.
Allowing optional diagnostic data collection will provide more in-depth system insights for Microsoft to analyze performance issues and usage trends and improve Windows features. However, it also permits more data sharing of your device usage.
You can customize how much data is collected based on your privacy, features, and functionality preferences. Some options to consider:
- Disable all optional diagnostic data for maximum privacy. Microsoft collects only essential system data.
- Enable basic optional data to allow some analytics and reporting to enhance Windows without sharing sensitive details.
- Fully enable optional diagnostic data to provide Microsoft with comprehensive system insights, which helps optimize Windows for your needs. But be aware of all data collection and sharing.
You can change these settings at any time based on your priorities. Go to Settings > Privacy & Security> Diagnostics & Feedback to adjust data collection levels.
Restart your PC or wizard after making any changes to the diagnostic settings for them to take effect fully.
If you’re using Windows 10 or Windows 11, you can disable Microsoft Compatibility Telemetry by following these steps:
Disable Microsoft Compatibility Appraiser via Task Scheduler
- Through Task Scheduler, search the Start Menu for “Task Scheduler” and open it. In the left sidebar, navigate to:
- Task Scheduler Library > Microsoft > Windows > Customer Experience Improvement Program
- Disable the following tasks:
- Consolidator: Disables general Windows telemetry.
- DefaultAccountConsolidatorTask: Disables default account telemetry.
- CEIPTask: Disables additional telemetry tasks.
- PassportTask: Disables Passport account synchronization.
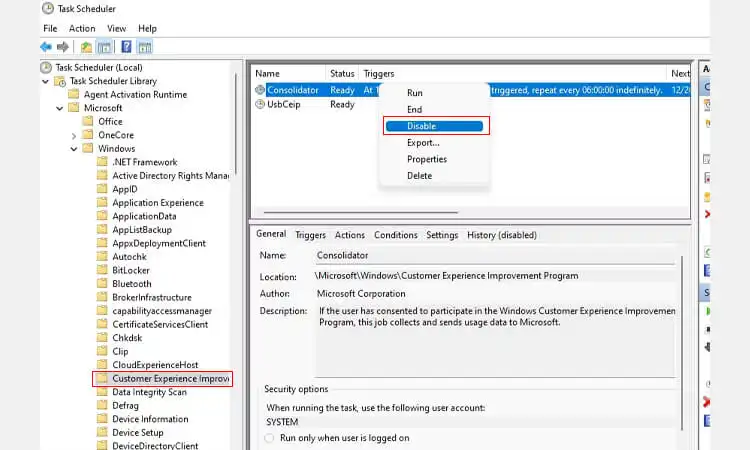
Restart the PC to complete disabling all telemetry data collection methods.
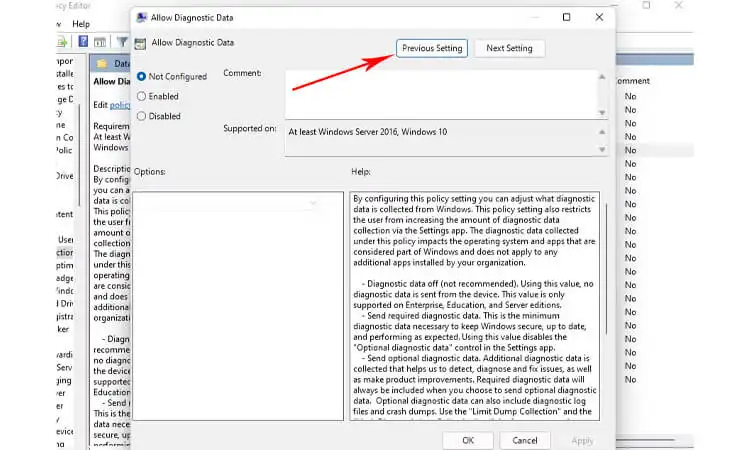
Disable Windows Compatibility Telemetry via Group Policy Editor
- Press Win + R keys together to open the Run window, or just simply type cmd in the search box and hit enter to open the Command Prompt.
- window with administrative access (Windows logo key + X).
- Type gpedit. msc in the Run dialog box or Command Prompt window and press Enter key to open Group Policy Editor.
- To configure the data collection and logging options, navigate to Computer Configuration > Administrative Templates > Windows Components > Data Collection & Logging.
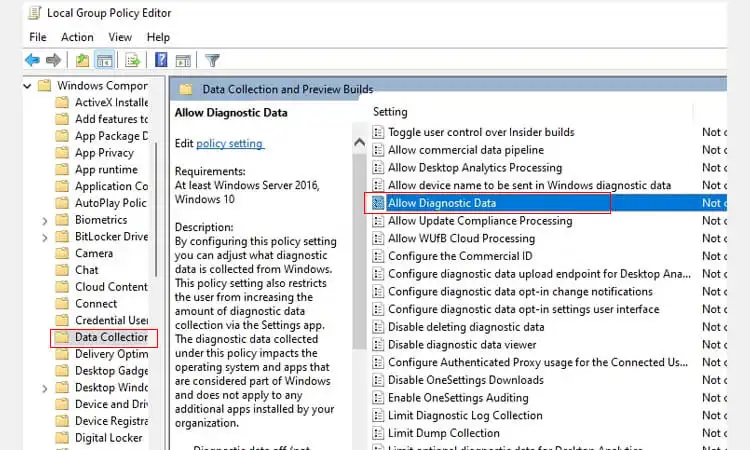
- “Allow Telemetry” and set it to Disabled so it cannot collect data by clicking the Action option and the Edit button, then selecting the Disabled option from the dropdown list under Value Data Collection & Logging: Allow telemetry.
- Select the Disabled option from the dropdown menu and click Apply button to save changes made earlier. Exit from the Local Group Policy Editor window when done with the changes.
Disable Microsoft Compatibility Telemetry Using Registry Editor
- Open the Registry Editor by pressing Windows + R and typing regedit. Click OK or press Enter.
- In the left pane of the Registry Editor window, navigate to HKEY_LOCAL_MACHINE\SOFTWARE\Policies\Microsoft\Windows NT\DNSClient. If you don’t see this folder, create it by right-clicking in the upper left-hand corner of the window and selecting New > Key from the dropdown menu that appears.
- Right-click on DNSClient and select New > DWORD (32-bit) Value from the dropdown menu that appears. Name this new value “Allow telemetry”.
- Double-click on Allow telemetry and change its value to 0 (zero). Press OK when finished changing values in this window if prompted.
- Close out of all windows by clicking File> Exit or pressing Ctrl+Q.
Deactivate Telemetry by Deactivating Telemetry Services
- Launch the Services console by pressing Win + R, typing “services. msc”, and pressing Enter.
- In the Services console, locate the service named “Connected User Experiences and Telemetry” and double-click on it to launch its properties.
- In the General tab, change the Startup type to “Disabled,” then click “OK.”
- Look for another service named “Device Management Wireless Application Protocol (WAP) Push message Routing Service” and disable it the same way.
- Restart your PC to apply the changes.
If you don’t want to spend time looking for these services, you can use the Command Prompt to disable them instead. Here’s how:
- Press Win + R, type “cmd,” and press Ctrl + Shift + Enter to launch the Command Prompt as an administrator.
- Run the following commands one by one:
sc stop "DiagTrack."sc config "DiagTrack" start=disabledsc stop "dmwappushservice"sc config "dmwappushservice" start=disabled - Restart your PC to apply the changes.
Running the SFC Scan will Repair Any Corrupted or Missing Windows System Files
SFC is a command-line tool that scans for and repairs corruptions in Windows system files. It is used to fix issues with DLL errors and missing files, among other problems. To repair windows system files, you can run SFC Scan.
- Step 1: Open the Control Panel window by pressing the [Windows] key + R on your keyboard and typing “control” into the Run box. Then click OK.
- Step 2: Click “System and Security” in the left-hand menu pane, then click “Administrative Tools.” On older versions of Windows, this option may be called “Performance Information and Tools.”
- Step 3: Double-click “Command Prompt,” which will open up a command prompt window with administrator privileges access (if prompted for an administrator password or confirmation).
- Step 4: Type “sfc /scannow” without quotation marks into the command prompt window, then press [Enter]. This will run System File Checker (SFC) scan on your computer to check for any corrupted system. Depending on how many files need to be repaired, this may take a few minutes.
- Step 5: If no errors are found during this scan, your PC will automatically restart when it’s finished. The next time your computer boots up again, you can check your event viewer for any related errors or warnings (by typing Event Viewer into Cortana).
Best Practices for Managing Microsoft Compatibility Telemetry
Managing Microsoft Compatibility Telemetry requires a comprehensive approach that considers system performance, privacy concerns, data collection, and the potential impact of different solutions. Here are some best practices to consider:
- Regularly check for updates to Microsoft Compatibility Telemetry and install the latest patches and fixes. Updates may include improvements to reduce data collection and system impact.
- Closely monitor your system performance using Task Manager, Resource Monitor, or a third-party tool to check for high CPU, memory usage, or other performance issues caused by Microsoft Compatibility Telemetry. Look for spikes in usage that could indicate excessive data collection or background activity.
- Adjust your system settings to optimize performance, reduce data collection, and minimize the impact of Microsoft Compatibility Telemetry.
- Consider disabling unnecessary background apps, limiting background network activity, reducing the frequency of diagnostics reports, or turning off specific components like the Telemetry Client.
- Use privacy-enhancing software such as a VPN, tracker blocker, or dedicated Microsoft telemetry reducer to limit how much data is collected and sent to Microsoft. Know exactly what information Microsoft Compatibility Telemetry gathers on your system and software usage.
- Understand that reducing Microsoft Compatibility Telemetry may impact the functionality of some Microsoft applications and prevent certain features from working properly. Not all impacts can be avoided when limiting data collection.
If issues persist with Microsoft Compatibility Telemetry or if you need more advanced solutions, seek help from a tech expert. They can guide the optimal levels of data collection for your needs or recommendations for third-party disabling softwar
Managing Microsoft Compatibility Telemetry requires carefully balancing system performance and user privacy. By following best practices and staying informed about updates and new developments, users can optimize their system performance and minimize the impact of Microsoft Compatibility Telemetry. We hope this blog has provided helpful insights and solutions for those experiencing issues with this service.
Microsoft Compatibility Telemetry Problem
-
What is Microsoft Compatibility Telemetry, and what does it do?
Microsoft Compatibility Telemetry is a Windows service that collects diagnostic and usage data from Windows devices, including information about hardware, software, and system configurations. Microsoft uses this data to improve the quality and performance of its products.
-
What kind of data does Microsoft Compatibility Telemetry collect from users’ computers?
Microsoft Compatibility Telemetry collects information about users’ hardware and software configurations and data about how users interact with Windows and Microsoft applications. This can include information about crashes, errors, and performance issues.
-
Can users opt out of Microsoft Compatibility Telemetry, and if so, how?
Users can opt out of Microsoft Compatibility Telemetry by disabling the service or by configuring Windows to limit the amount of collected data. However, disabling the service may impact the performance and reliability of Windows and Microsoft applications.
-
How does Microsoft ensure that the data collected by Microsoft Compatibility Telemetry is kept secure and confidential?
Microsoft has implemented several security and privacy measures to protect the data collected by Microsoft Compatibility Telemetry, including encryption, access controls, and data retention policies.
-
How does Microsoft Compatibility Telemetry communicate with Microsoft servers, and what kind of network traffic does it generate?
Microsoft Compatibility Telemetry communicates with Microsoft servers over encrypted channels using protocols such as HTTPS and SSL. The service generates relatively low levels of network traffic, but this can vary depending on the amount of data being collected and the frequency of data uploads.
-
Can Microsoft Compatibility Telemetry affect the performance or stability of users’ computers?
In some cases, Microsoft Compatibility Telemetry may impact the performance or stability of users’ computers, particularly if the service collects and transmits large amounts of data. However, this is typically not a significant issue for most users.
-
How does Microsoft ensure that Microsoft Compatibility Telemetry complies with data protection regulations such as GDPR and CCPA?
Microsoft has implemented measures to ensure that Microsoft Compatibility Telemetry complies with data protection regulations, including providing users with transparency and control over their data, implementing appropriate security and privacy controls, and complying with data retention and deletion requirements. Additionally, Microsoft has published detailed information about how it collects and uses data through its privacy policies and other documentation.
-
Can I end the task Microsoft Compatibility Telemetry?
Yes, you can. Microsoft Compatibility Telemetry is a service that runs in the background of your computer and collects information about how you use it. This includes what programs you use, how long each program takes to load, and whether or not any errors occur when launching or using the programs. It also collects information about the files on your device, including where they’re stored and what type of files they are. It’s important to note that even if you disable this service, it’ll still collect information about your location (if enabled) and data about any websites you visit with Windows Edge—even if you’ve disabled Cortana.
-
Is It Safe to Disable Microsoft Compatibility Telemetry?
Yes! Disabling Microsoft Compatibility Telemetry will keep your computer from collecting data about your device’s use and what programs are installed. It shouldn’t affect any other services on your machine, either. However, it’s always a best practice to install Microsoft Updates to ensure everything works as expected before making changes, such as disabling the service entirely. If anything seems off after disabling this service immediately after updating Windows 10 (or Windows 7/8), then re-enable it.
-
How do I Turn Off Windows 10 Telemetry?
If you’re having problems with Windows 10 telemetry, you can use the Group Policy Editor to disable it. Go to Start, type “gpedit. msc,” and press Enter. Navigate to the following path: Computer Configuration > Administrative Templates > Windows Components > Data Collection And Preview Builds. Double-click “Allow Telemetry” and set it to Disabled.
-
What are the Benefits of Microsoft Compatibility Telemetry?
By sending telemetry data back to Microsoft, you can help the company make future operating systems more compatible with your device. This includes compatibility with hardware drivers, software applications, and other programs running on your computer.
-
Why does Microsoft Compatibility Telemetry Consume Such a Large Amount of CPU Resources?
The Microsoft Compatibility Telemetry process consumes a lot of CPU resources because it needs to run in the background and constantly monitor your computer’s hardware, software, and network. This service aims to collect information about how well your computer works with new and updated programs.
This data is sent to Microsoft so they can use it to improve their products. However, when you’re not actively using your computer, the program will use up more than one percent of your CPU. If you don’t want this happening, you can disable it by going into Windows Settings > Privacy > Feedback & Diagnostics > Diagnostic And Usage Data > Change Settings for All Users or just for yourself.
 Guide")


