
Welcome to our in-depth guide on how to read RFID tags with an Arduino. Whether you’re a hobbyist, a student, or a tech enthusiast, understanding how to harness the power of RFID technology can open up a world of possibilities. In this guide, we will take you through the entire process of reading RFID tags with Arduino, providing you with a clear and structured approach.
The Basics of RFID Technology and Arduino
Before diving into the specifics, it’s essential to grasp the fundamentals of RFID technology and Arduino. RFID (Radio Frequency Identification) is a wireless technology that enables the identification and tracking of objects using radio waves. On the other hand, Arduino is an open-source electronics platform known for its versatility and ease of use. By combining these two technologies, you can create innovative projects that leverage the unique capabilities of RFID tags.
Setting up Your Arduino for RFID Tag
Before proceeding, ensure you have the necessary components. Refer to the product manuals for specific pin configurations and requirements.
Step 1: Gather the Required Components
- Arduino board (e.g., Arduino Uno)
- RFID reader module (compatible with Arduino)
- Jumper wires (male-to-male and male-to-female)
- RFID tags (compatible with the reader module)
- USB cable for connecting Arduino to your computer
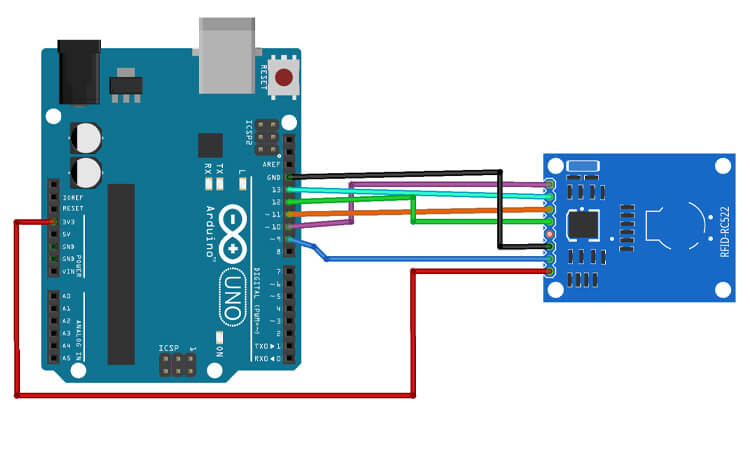
Step 2: Connect the RFID Reader Module to Arduino
- Take the RFID reader module and identify the necessary pins: SDA, SCK, MOSI, MISO, RST, and GND.
- Connect the RFID reader module to your Arduino board using jumper wires as follows:
- Connect the SDA pin of the RFID module to the digital pin 10 on Arduino.
- Connect the SCK pin of the RFID module to the digital pin 13 on Arduino.
- Connect the MOSI pin of the RFID module to the digital pin 11 on Arduino.
- Connect the MISO pin of the RFID module to the digital pin 12 on Arduino.
- Connect the RST pin of the RFID module to any digital pin on Arduino (e.g., digital pin 9).
- Connect the GND pin of the RFID module to the GND pin on Arduino.
- Connect the VCC pin of the RFID module to the 3.3V or 5V pin on Arduino, depending on the module’s voltage requirements.
Step 3: Connect Arduino to Your Computer
- Take the USB cable and connect one end to the USB port on your Arduino board.
- Connect the other end of the USB cable to an available USB port on your computer.
Step 4: Install the Arduino Software (IDE)
- Open your preferred web browser and visit the Arduino website (https://www.arduino.cc).
- Download the latest Arduino Software (IDE) version suitable for your computer’s operating system.
- Once the download is complete, run the installer and follow the on-screen instructions to install the Arduino IDE.
Step 5: Select the Correct Arduino Board and Port
- Launch the Arduino IDE on your computer.
- From the “Tools” menu, select “Board” and choose the appropriate Arduino board model you are using (e.g., Arduino Uno).
- From the same “Tools” menu, go to the “Port” option, and select the port to which your Arduino board is connected (e.g., COM3 or /dev/ttyUSB0). Note: If you’re unsure about the pier, you can check it in the Device Manager (Windows) or System Information (macOS).
Step 6: Install the RFID Library
- In the Arduino IDE, go to the “Sketch” menu, select “Include Library,” and then click on “Manage Libraries.”
- The Library Manager window will open. In the search bar, type “RFID.”
- Look for a library such as “MFRC522” or “RFID” by different authors, and click on the “Install” button to install the library.
- Wait for the installation to complete.
Step 7: Verify the RFID Reader Module Connection
- In the Arduino IDE, go to “File” > “Examples” > “MFRC522” (or the library you installed) and choose an example sketch to open.
- Review the comments in the sketch to understand its functionality.
- Upload the sketch to your Arduino board by clicking on the right-facing arrow button (or selecting “Sketch” > “Upload”).
- After uploading, open the Serial Monitor in the Arduino IDE by clicking on the magnifying glass icon in the top-right corner or selecting “Tools” > “Serial Monitor.”
Step 8: Test RFID Tag Reading
- Hold an RFID tag near the RFID reader module.
- Check the Serial Monitor window in the Arduino IDE.
- If everything is set up correctly, you should see output messages displaying the tag’s information, such as tag UID (Unique Identifier) or data.
Step 9: Customize and Build Your RFID Project
You can explore various RFID project ideas now that you have successfully set up your Arduino for RFID tag reading. Use the knowledge gained from the previous steps to develop your applications, such as an access control system, inventory management solution, or interactive projects that utilize RFID technology.
Note: Remember to refer to the RFID reader module’s datasheet and the specific library documentation for more advanced functionality and configuration options.
Congratulations! You have successfully set up your Arduino board for RFID tag reading. You can now further explore RFID technology’s capabilities with Arduino.
Before proceeding with the following steps, make sure you have completed the setup process described previously. Next, we will use the MFRC522 RFID module and MFRC522 library to implement RFID tag reading.
Step 1: Open the Arduino IDE and Create a New Sketch
- Launch the Arduino IDE on your computer.
- Go to “File” > “New” to create a new sketch.
Step 3: Include the RFID Library
To enable RFID tag reading, include the RFID library in your sketch. To do this, click on “Sketch” in the menu bar, select “Include Library,” and choose the RFID library you installed earlier (e.g., “MFRC522”).
Step 4: Define Pins and Variables
In your sketch, define the digital pins used for communication with the RFID reader module. Add the following lines at the beginning of your sketch:
#include <SPI.h>
#include <MFRC522.h>

#define SS_PIN 10  // Set the SS_PIN value to the pin connected to the RST pin of the RFID reader module
#define RST_PIN 9  // Set the RST_PIN value to the pin connected to the RST pin of the RFID reader module

MFRC522 mfrc522(SS_PIN, RST_PIN);  // Create an instance of the MFRC522 RFID library
Step 5: Set Up the RFID Reader Module
In the setup() function of your sketch, initialize the RFID reader module by adding the following lines:
void setup() {
  Serial.begin(9600);  // Start serial communication
  SPI.begin();  // Initiate SPI bus
  mfrc522.PCD_Init();  // Initialize the RFID reader module
  Serial.println("Scan RFID tag...");
}
In the loop() function of your sketch, add the code to read RFID tags. This code continuously checks for the presence of an RFID tag and prints its UID (Unique Identifier) to the Serial Monitor. Add the following lines:
void loop() {
  // Check for new RFID tags
  if (mfrc522.PICC_IsNewCardPresent() && mfrc522.PICC_ReadCardSerial()) {
    // Read the UID of the tag
    String uidString = "";
    for (byte i = 0; i < mfrc522.uid.size; i++) {
      uidString += String(mfrc522.uid.uidByte[i] < 0x10 ? "0" : "");
      uidString += String(mfrc522.uid.uidByte[i], HEX);
    }
    Serial.println("RFID tag detected. UID: " + uidString);
    mfrc522.PICC_HaltA();  // Halt PICC (Passive Communication Integrated Circuit)
    mfrc522.PCD_StopCrypto1();  // Stop encryption on PCD (Proximity Coupling Device)
  }
}
Step 7: Upload and Test the Sketch
- Connect your Arduino board to your computer using the USB cable.
- Click on the right-facing arrow button (or select “Sketch” > “Upload”) to compile and upload the sketch to your Arduino board.
- Once uploaded, open the Serial Monitor in the Arduino IDE by clicking on the magnifying glass icon in the top-right corner or selecting “Tools” > “Serial Monitor”.
- Hold an RFID tag near the RFID reader module.
- Observe the Serial Monitor to view the UID of the detected RFID tag.
To read multiple RFID tags, repeat steps 6 and 7 for each tag. Ensure that you have separate actions defined in the loop() function for different tags.
Note: Make sure the RFID tags are compatible with the frequency supported by your RFID reader module.
You have successfully implemented the code to read RFID tags with your Arduino board. Following these step-by-step instructions, you can now detect and display the UID of RFID tags in the Serial Monitor. Feel free to explore further and enhance the functionality to suit your specific project requirements.
As with any technical endeavor, challenges may arise along the way. This section will address some common troubleshooting scenarios and frequently asked questions to help you overcome any hurdles you may encounter.
Troubleshooting:
- Issue 1: RFID reader module not detected by Arduino.
- Check the wiring connections between the RFID reader module and Arduino. Ensure that the correct pins are correctly connected.
- Verify that the RFID reader module is compatible with your Arduino board.
- Double-check the power supply to the RFID reader module, ensuring it receives the appropriate voltage.
- Try restarting the Arduino IDE and reconnecting the Arduino board to your computer.
- Issue 2: RFID tags are not being read or recognized.
- Ensure the RFID tags are compatible with the frequency your RFID reader module supports.
- Ensure that the RFID tags are placed within the reading range of the RFID reader module.
- Check the orientation of the RFID tags. Some tags may have a specific side that needs to face the reader for successful reading.
- Verify that the RFID reader module is functioning correctly by testing it with different RFID tags, if available.
- Ensure that the RFID reader module and Arduino are properly connected and powered.
- Issue 3: Inconsistent or incorrect data read from RFID tags.
- Confirm that the RFID tags are not damaged or malfunctioning. Test with different tags to ensure accuracy.
- Check the code in your Arduino sketch. Ensure that the data extraction process is correctly implemented.
- Pay attention to any formatting or encoding requirements specific to the RFID tags you are using.
- Adjust the position and orientation of the RFID tags to ensure a stable and reliable reading.
Frequently Asked Questions (FAQs):
- FAQ 1: Can I use any RFID reader module with Arduino?
- Not all RFID reader modules are compatible with Arduino. It’s crucial to select a module that is explicitly designed for Arduino or has Arduino library support. Verify the compatibility and check for Arduino library availability before purchasing an RFID reader module.
- FAQ 2: Can I use multiple RFID tags simultaneously?
- Yes, Arduino can read multiple RFID tags in succession. Make sure your code accounts for detecting and processing multiple tags. Consider implementing a loop or an array-based approach to handle multiple tag readings.
- FAQ 3: How far is the reading range of RFID tags?
- The reading range of RFID tags can vary depending on the specific RFID reader module and tag type. Generally, the reading range ranges from a few centimeters up to several meters. Refer to the documentation or datasheet of your RFID reader module for detailed information on the reading range.
- FAQ 4: How can I enhance the reading range of RFID tags?
- Consider using RFID reader modules with a longer reading range specification to improve the reading range.
- Ensure that the power supply to the RFID reader module meets the recommended voltage requirements.
- Experiment with adjusting the antenna position or orientation of the RFID reader module to optimize the reading range.
- FAQ 5: Can I write data to RFID tags using Arduino?
- Some RFID tags support read-and-write operations. Check the specifications of the RFID tags you are using to determine if they are writable. You can use Arduino and appropriate libraries to write data to the tags if they are.
In this guide on “How to Read RFID Tags with an Arduino,” we provide a detailed walkthrough on how to read RFID tags with an Arduino. We cover the setup process, step-by-step instructions for reading RFID tags, troubleshooting tips, and project ideas. By following our guide, you will gain a solid understanding of setting up Arduino and the RFID reader module, writing code to read RFID tags, and addressing common issues that may arise.
 Guide")


